Drone-captured Orthomosaic Property Map

This doc takes you step-by-step through everything you'll need to do to create a Google Maps-like aerial view of your property in less than a day and for under $1500. It assumes intermediate level computer knowledge and requires a little bit of command line use.
At a high level the steps to create the map are: buy and configure a drone, capture images on a mapping mission, stitch and orthorectify them together into a single seamless image, and then split that image into tiles suitable for hosting online.
The most daunting aspect of this process was doing all the research and narrowing down the solution space to find a workflow that produces good results. I'm happy with this workflow so I thought I'd share an opinionated guide that walks you through the steps.
Rationale
Why go to the effort of creating your own drone-captured orthomosaic when satellite maps exist? Mapping providers create their aerial maps from satellites captures and airplane flyovers over which you have no control. The benefits of DIY maps include image quality, control, and ownership.
Drone-captured orthomosaics can be super clear with a resolution of 5 cm/px or better, compared to 30 cm/px with the best commercial satellites.
Furthermore you have full control over when you take the photos in order minimize shadows and cloud cover. You can repeat the process as often as you like to have the most frequent coverage and up-to-date maps.
And finally you have full ownership of the images and copyright so you can use them however you like.
Hardware and Software Requirements
There are many options when it comes to drone selection and software toolchain. The following selections worked well for me so the rest of the doc will be prescriptive and guide you through how I did it. The software instructions assume macOS and iOS.
| Purpose | Product | Price |
|---|---|---|
| Drone | DJI Air 2S | $1039 |
| Storage | microSD card | $16 |
| Flying | DroneLink Hobbyist Elite | $100 |
| Infrastructure | Docker | Free |
| Stitching | OpenDroneMap | Free |
| Tiling | GDAL | Free |
Prepare Drone
I selected the DJI Air 2S because it seemed to be a decent and reasonably priced consumer drone. I purchased the Fly More Combo for extra batteries and accessories. I also bought the Care Refresh insurance during set up just in case.

When the drone arrives, unpack the box and follow the instructions to set it up. Charge the batteries and controller, install the propeller blades, and remove the various stickers.
Once the batteries are charged go through the software set up. Download the DJI Fly app to your phone, place your phone in the DJI remote, and connect the lightning cable to your phone. Turn on the drone and controller and then use the app to update all relevant software.
Compliance
Before you fly you'll need to register the drone and acquire an FAA license. The registration costs $5. You'll need the drone ID, which only appeared in the DJI app once I was running the latest firmware version. Tape the registration number to the outside of your drone.
If you are flying non-commercially you'll just need the TRUST license which you can get online by taking a free test.
Downloading Photos
I recommend buying a microSD card and not relying on the drone's internal storage. It's a huge hassle to download media from the Air 2S's internal storage. The only way I could get it to mount as an external storage device was by using a USD-C to USB-A cable and then a USB-A to USB-C adapter on my computer. And even then only one port on my computer recognized it. Use the microSD card.
Plan Your Flight
Register with DroneLink and purchase the Hobbyist Elite version. You might be able to get away with the Premium version, but I figured it's better to have all the features.
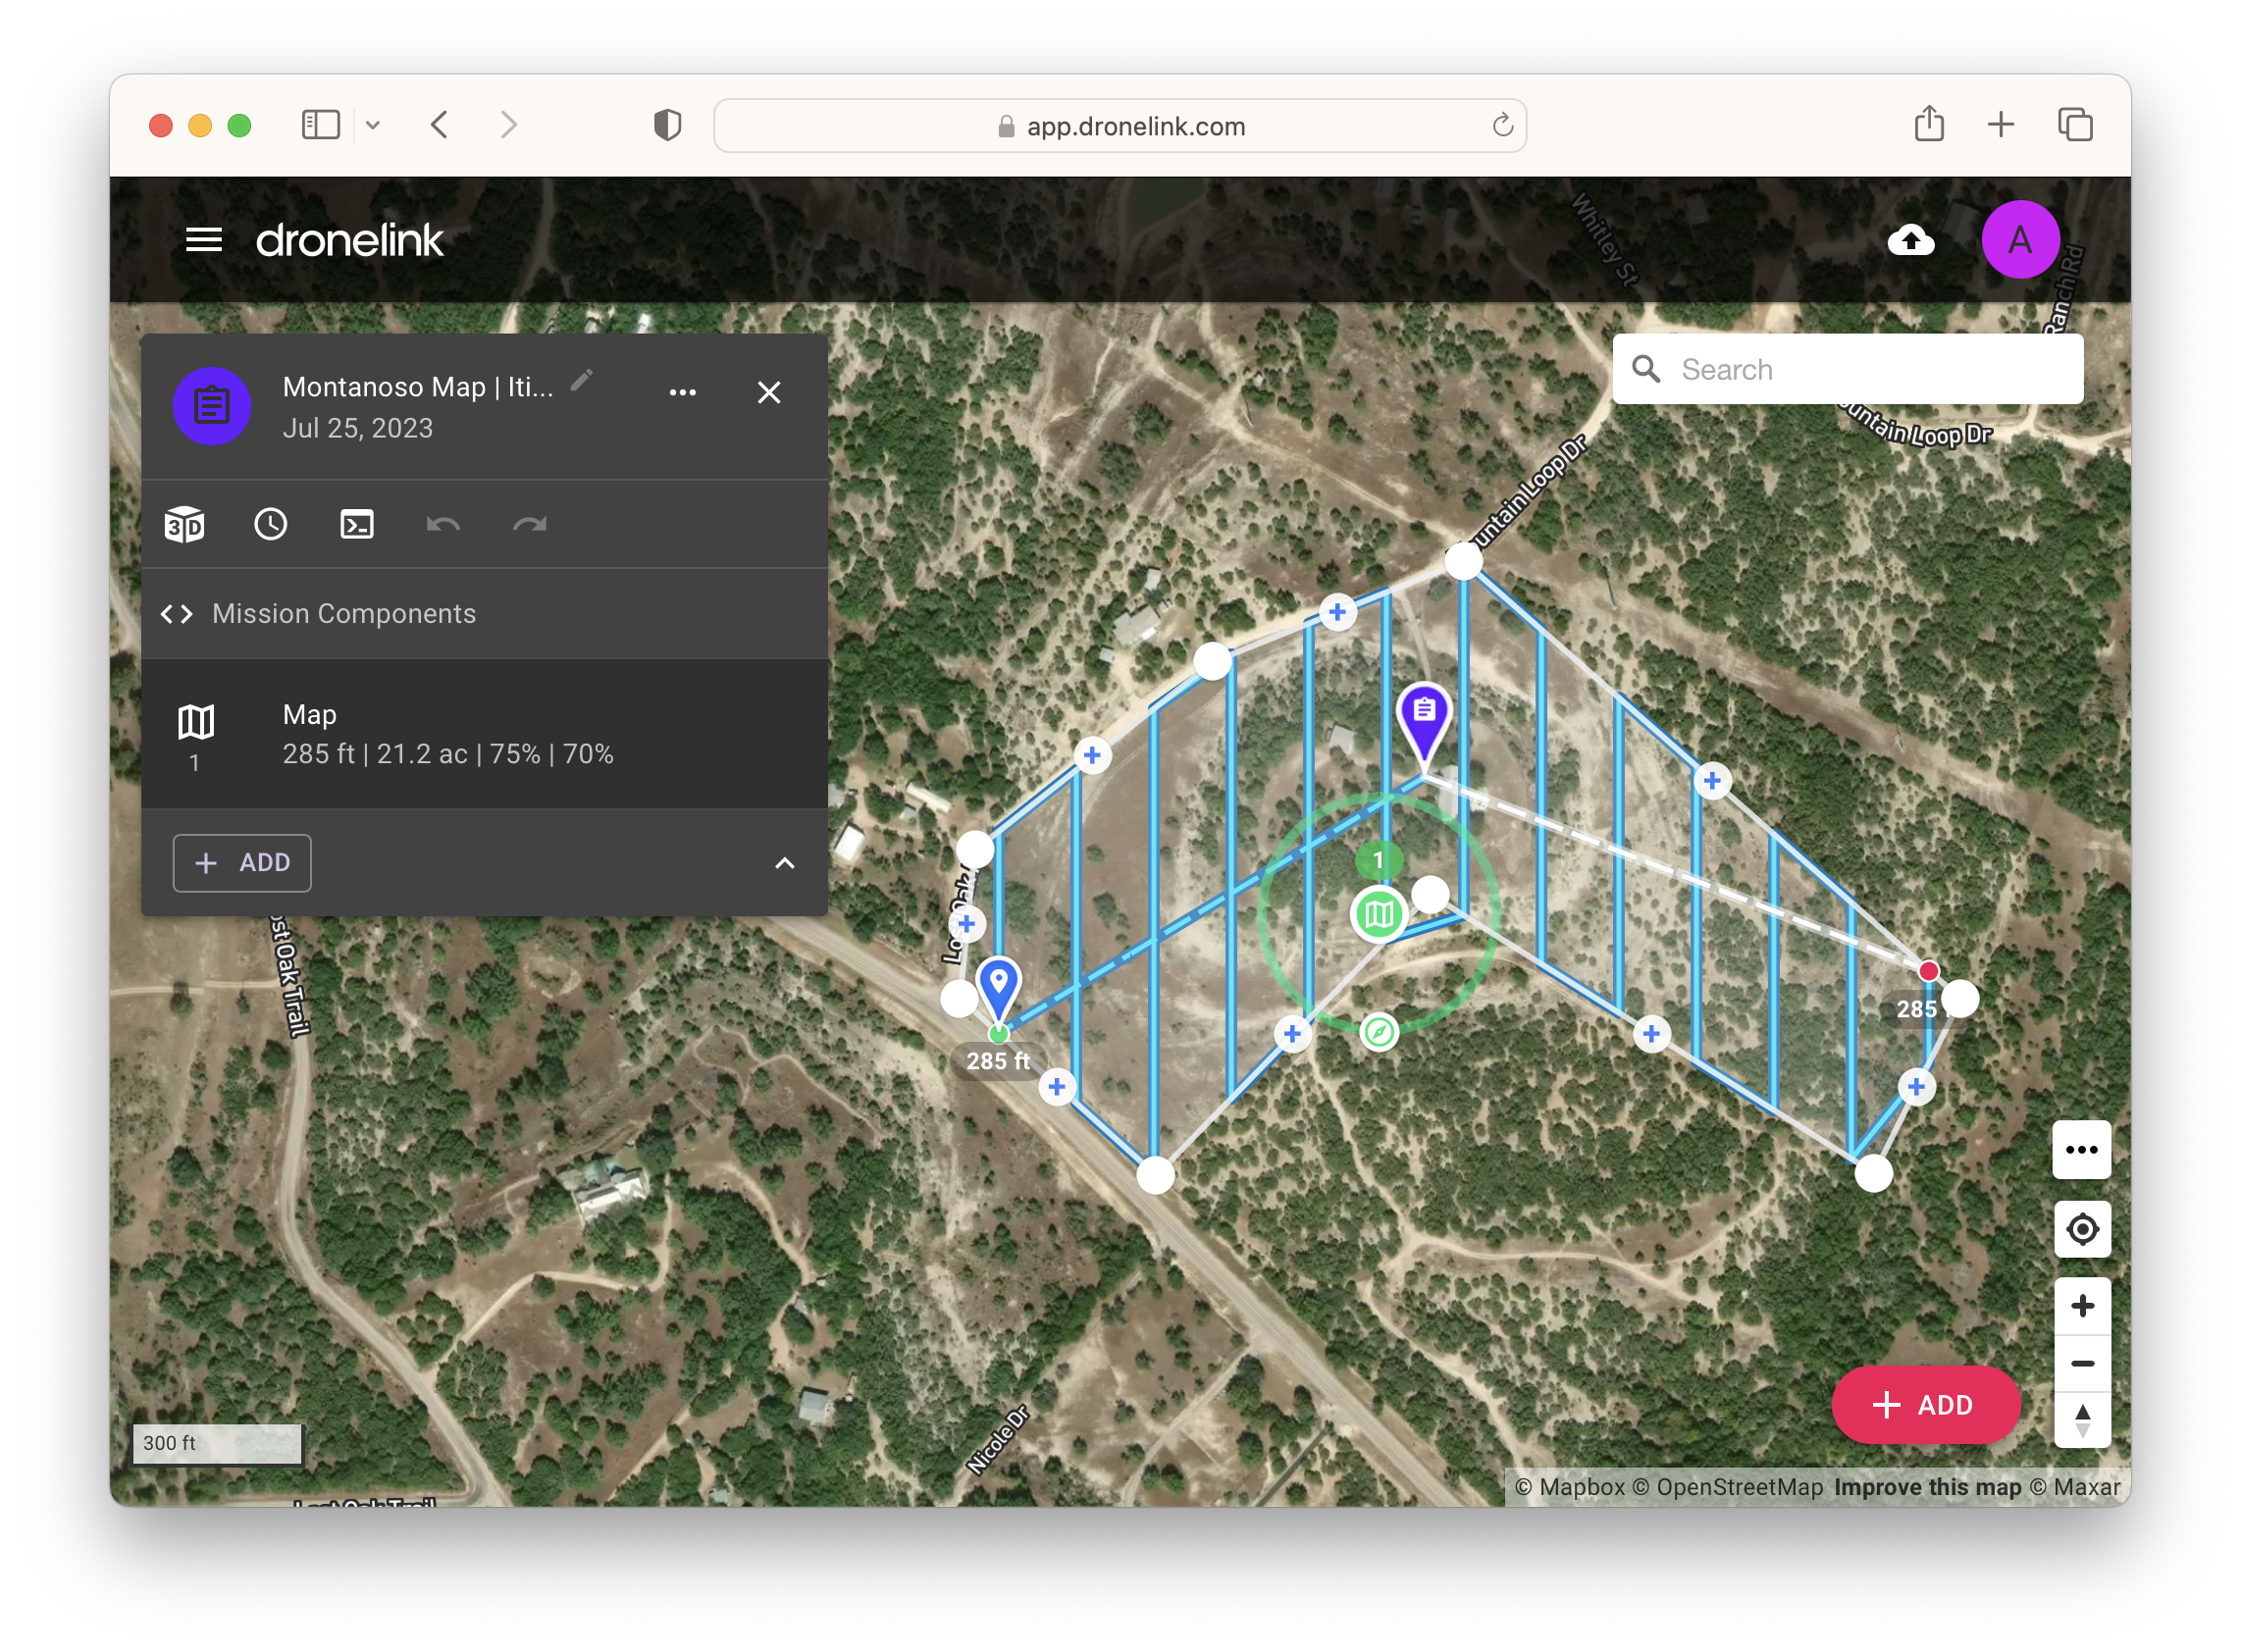
I like to plan missions on the website because the website is easier to use than the app. Click Create and then select Map mission. Drag the bounds of the polygon to match the boundary of your property. Then click the green Map icon and select DJI Air 2S (or whatever drone you purchased). That's it, the default settings work well.
Fly The Route
Take your drone to the start location. Ideally somewhere in the middle of the property with good line of sight to the entire route. Open the DroneLink app and then turn on the drone and controller. Once everything is connected click the Play button and wait as the drone automatically takes off and takes photos along the entire flight plan. It'll return home and land once it's done.
Stitch Orthomosaic
Download the photos to your computer. Create a scratch directory and place a folder named "images" inside it containing all the captured images.
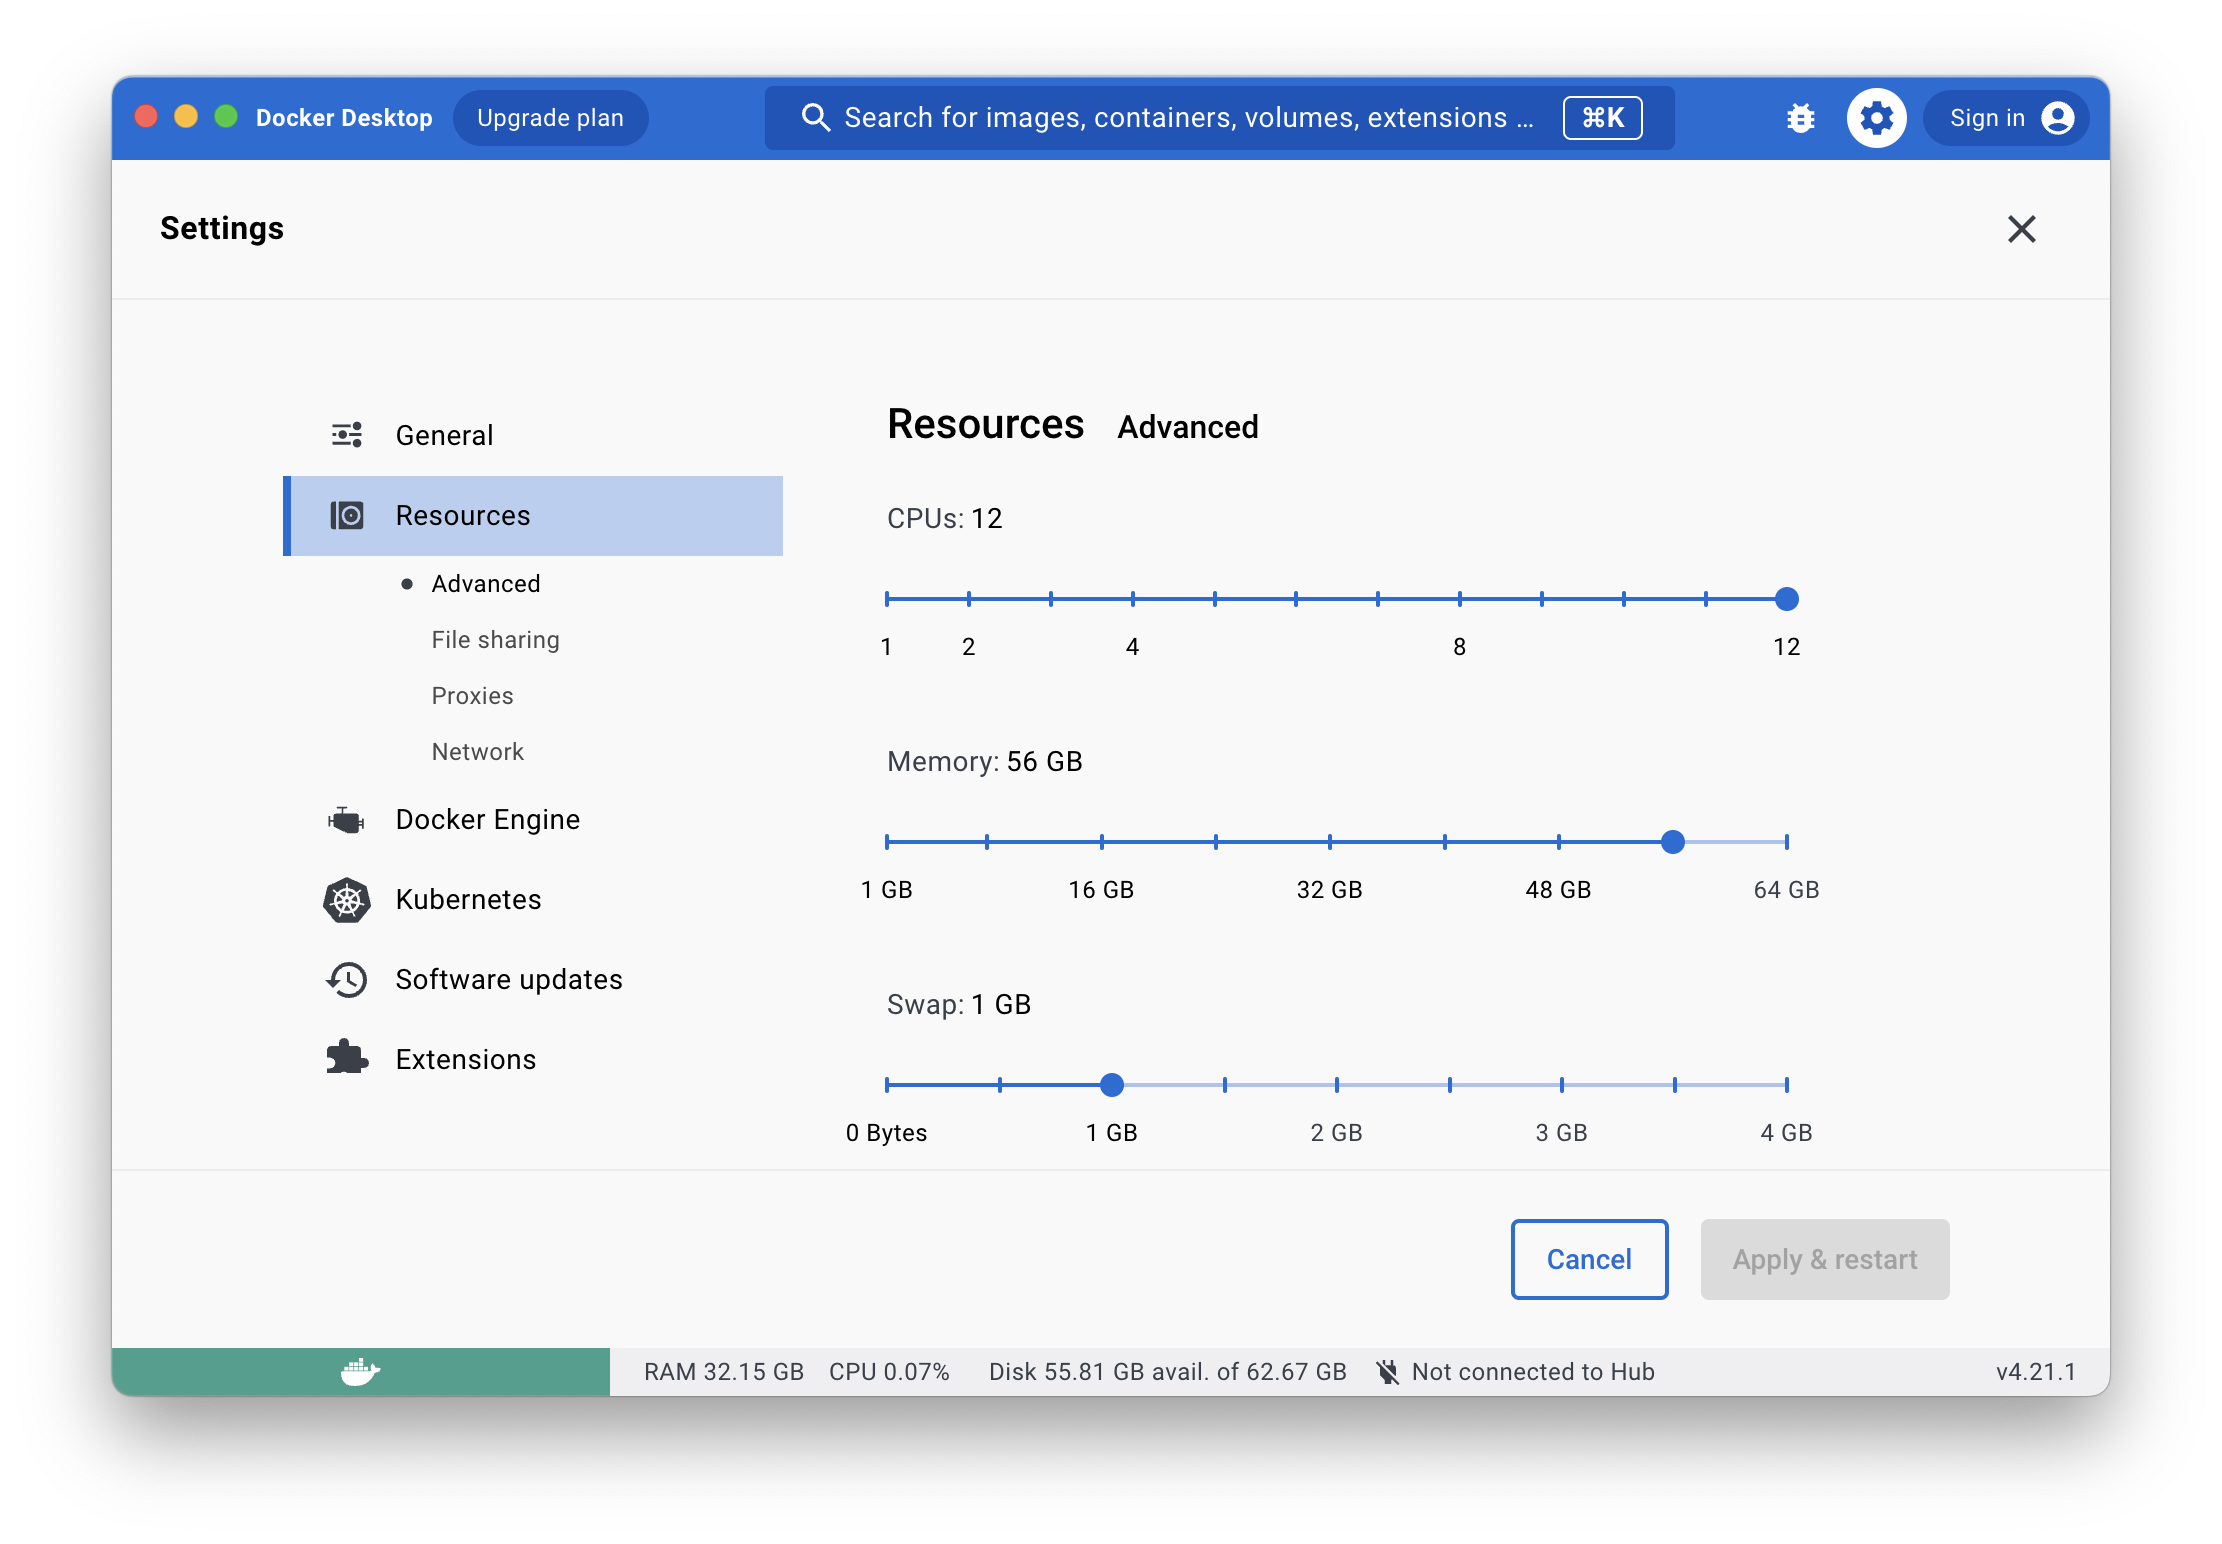
Install Docker. Go to Settings -> Resources and crank up the CPUs and memory allocated to containers. The more you can give it the faster the processing will run.
OpenDroneMap has a product called WebODM that let's you do all this using a website running locally, but I prefer the command line so that's what I'll walk you through.
SCRATCH_DIR=~/scratch
CONCURRENCY=10

docker run -ti --rm -v $SCRATCH_DIR:/datasets/code opendronemap/odm \
  --project-path /datasets --max-concurrency $CONCURRENCY
Set SCRATCH_DIR to the directory you created earlier and set the CONCURRENCY to the number of cores in your computer. Then run the docker command and that's it. By default it'll stitch together all photos into an orthomosaic that you can find in $SCRATCH_DIR/odm_orthophoto/odm_orthophoto.tif.
Split Into Tiles
You can append --tiles to the end of the above command and it'll automatically create TMS files in orthophotos_tiles that you can use for hosting the map online. However I prefer to create the tiles manually because ODM uses the average resampling method which I think looks worse than using lanczos resampling.
Use the following commands to download GDAL and split the orthomosaic into tiles. Adjust the zoom levels as necessary for the scale of your property. Use the find command to delete the XML files that the GDAL creates.
docker run -ti --rm -v $SCRATCH_DIR:/datasets/code ghcr.io/osgeo/gdal:alpine-normal-latest \
  gdal2tiles.py --processes=$CONCURRENCY --no-kml --webviewer leaflet --tiledriver=WEBP \
  --resampling=lanczos --zoom=16-21 /datasets/code/odm_orthophoto/odm_orthophoto.tif \
  /datasets/code/webmap

find $SCRATCH_DIR/webmap/21  -type f ! -name "*.webp" -delete
Open $SCRATCH_DIR/webmap/leaflet.html and select Layer in the top right to view your tiles. The colors won't look right because the layer has an opacity. You can edit the HTML and delete opacity: 0.7, to make it look better. Edit the HTML as necessary to suit your needs. Then upload the HTML and numbered directories to a web host of your choice and you're all set. Now you have a high-resolution, self-hosted map of your property!